June 6th is one of the many days I think of my Uncle Teddy, the man who introduced me to gardening at the tender age of 6. Because of him, I began my long journey into gardening. I’ve written about him in previous posts.
This year on June 6th, I opened my garden to benefit the Huntington Historical Society. It was so fitting that it fell on Uncle Teddy’s birthday since, in the garden, he and I are entwined together. For five hours straight I taught, explained, identified plants, offered historical references, shared my knowledge, and thoroughly enjoyed myself. Between 200-250 people came to enjoy my creation.
June 6, 2021, Huntington Historical Society Garden Tour – Welcoming the Docents
I love to share my garden! This is a creation that I’ve been working on for over 30 years and what fun is it keeping it all to myself? That feels so selfish to me.
So the best thing I can do, since it’s hard for so many of you to travel here, is to take you on a garden tour around my 1/2 acre woodland walks in Northport NY. We’re Zone 7 here and this Garden Tour video is in the early spring on March 21, 2020 around 6pm in the evening.
I haven’t yet finished my fall cleanup at this point and of course, as gardeners well know, the garden is never perfect. At this time of year, in my neck of the woods, something new opens every single day. It’s a very exciting time for me each day as I walk around to see what’s new. Spring is about renewal. About optimism. About color. About surprises.
This is the first in a series of Garden Tour videos I’ll be doing so please remember to subscribe to my YouTube Channel to be alerted when I publish new videos.
My garden is the source material for almost all of my paintings. It is where I get my inspiration. It’s where I present yet another aspect of my creativity but this one is in 3D and seasonally adjusted over time and temperature.
So now, after an unusually warm & snow-free winter, the weather has already skimmed the high ’80’s during the month of May. As I sit on my deck exhausted from the heat, wondering how I’m ever going to be able to do all my planting after I’ve indulged at our plant sale & exchanged plant trophies with my gardening girlfriends.
The good news is that I’m a shade gardener. (That’s not to be confused with a shady gardener.) If I play my cards right I never have to bow down in the bright sun, slather myself in sunblock, or supply myself with a straw hat. The sun, which in my youth was my friend, now entices me only from sheltered nooks.
I garden in full shade, dappled shade, high shade, mostly shade & some minimal shade. Because shade is an elusive distinction, my garden is a type of laboratory. Often I’ll divide a plant in order to test the shade tolerances of specific species or cultivars. I document my garden with extensive photos & data as part of my enjoyment of the Art of gardening.
Shade gardens are about subtleties. Textures of leaves, the size & scale of those leaves, the shiny leaves versus those with indumentation, rough to the touch or smooth as suede. Color in the shade is not blinded out by the harsh sunshine. One can appreciate the varieties of green, the blue-greens, the lime-greens, the purple-greens & how about green-green. The color of an emerging stem or bud versus that in its maturity is quite an event to observe in the shade garden.
My shade garden is zen-like for me. It’s about savoring the space, the sounds of the birds singing for their supper, the smell of the soil on moist mornings, the wandering on my woodland walks.
Oh, and one final thing, because of the shade there is very little weeding to be done. Sweet!
Woodland walkways with Ginkgo bench in the distance.
(If you’d like to follow this project from the beginning you can start at Step 1 here)
Step 15 of Rear Garden Design Project.
So now that I measured the space, researched on the web, selected and took delivery of the bridge from GazeboCreations.com it is time to assemble the parts.
First you assemble the struts on a flat surface
Fortunately my son Michael gave me a Mother’s Day present of one day of labor. First he put together the base on the flat surface of the driveway.
Using a level to make sure the structure is balanced is critical to the entire process
Then he put the struts across the dry stream bed and used a bubble level to make sure that it was even both front to back and side to side. This is a very critical stage to the entire project.
All the holes are predrilled and make the assembly much easier to understand
Once the base is level and in place he attached the pre-drilled flooring in place. We used a thin nail as a spacer on each end of the boards to give some room for expansion as the boards swell with moisture. We attached the first board and then placed each successive board so we were sure of positioning before we attached them with screws.
It was useful to have two people to put the handrails together
By this time my husband Dave came home and couldn’t keep himself away from the project so he joined Michael in putting up the side rails. Each part of the bridge kit was clearly marked and pre-drilled for easy installation. Nevertheless, the assembly took hours to complete. The second time would have been much shorter.
I’m so happy to finally, after 9 years, have such a beautiful woodland setting
My son Michael was pleased to have the project over and next year I’ll probably get a pot of marigolds for Mother’s Day. It will be much easier for him.
My son Michael is happy the project is over.
After 9 years of waiting I’m so very happy with the outcome of the project. The bridge is such a perfect complement to the natural feeling of the woodland walks I’ve designed.
(If you’d like to follow this project from the beginning you can start at Step 1 here)
Step 14 of Rear Garden Design Project.
I searched online to find a garden bridge to replace our nine-year-old “temporary” bridge and I found a good selection at: gazebocreations.com.
I selected this bridge style from GazeboCreations.com
I measured across the dry streambed to determine the length I needed to cross the span. The website had very good information about the span size and other stats I needed to make my selection.
It was important to have a bridge that was the right scale for the project, a Goldilocks bridge, not too small, not too big, just right.
I ordered it online with the added options of stainless steel screws and 2 Coats Cedar Stain/Sealer to ensure greater longevity. This bridge has to last a lot longer then the temporary one did.
The boxes arrived by UPS and when I unpacked them I checked the parts list to make sure everything was there. It was complet I’m happy to say.
The bridge parts arrived well packaged and easily inventoried
We dismantled the “temporary” bridge that was always such a joy to the grandchildren on a day they weren’t visiting so the work went more smoothly. I thought I’d be nostalgic but I was far too happy to be finally getting a real garden bridge that I didn’t waste a moment dwelling on the past.
My son Michael helped to dismantle the nine year old “temporary” bridge
(If you’d like to follow this project from the beginning you can start at Step 1 here)
Step 13 of Rear Garden Design Project.
Now that I finally, after 9 years have my back entry stone walls and dry stream bed installed it is time for the decorating to begin.
For all these years we’ve been using what was supposed to be a temporary bridge. In 2000, when we originally began this project the construction crew built a plank bridge by hammering a few weather treated boards together and putting them over the dry stream bed.
My own grandsons have been born since the temporary bridge was originally installed and have grown up with the joy of bouncing wildly on the planks, much to the dismay of fathers, mothers and grandparents. Their utter joy in the flexibility of the boards and the semi dangerous and enthusiastic experience has provided untold hours of glee.
I felt somewhat bad for them and wondered how they would react to the disappearance of their favorite playground.
Fear not. They adapted instantly and have gone on to other adventures in the garden. I think they’ve found dinosaurs hiding along the woodland paths.
A sturdy old oak stump nestled in my woodland garden
This grand old oak tree was hollow and very much alive when I bought my property in 1989. It was a constant fascination to me that such a large tree could survive when so much of it’s trunk was hollow. This was years before I formally studied horticulture and learned about the xylem, cambium and phloem and their role in feeding the tree and keeping it alive.
I just loved the strength and endurance of this massive tree for what I could see with my own eyes. It had the ability to live year after year with half of it’s core gone, pushing out leaves in spite of itself. To me it was a tribute to raw determination.
A few years ago though, I noticed a decline in the top growth and I became concerned. This huge tree had always leaned quite heavily sideways and if it fell, though it wouldn’t land on any house or structure, it could fall onto the roadway and possibly injure folks driving off to do errands in their car. To avoid that possibility I called for a conference with my arborist, Eran Strauss of Tree Believers. We decided that the tree had indeed reached a tipping point and was now a danger.
Eran and I had his crew cut the tree to a height of about 25 feet so that if it fell, it would remain on my property and fall into my woodland walks. Though I missed this living example of determination, I felt relieved that danger was averted.
So one morning, weeks later, as I’m taking my first sip of coffee and looking out my kitchen window, something had dramatically changed in the garden. As I wandered out to examine the change I came upon the toppled top 15 feet or so of incredibly decayed pieces of oak tree trunk smashed to bits and strewn around the garden. The only damage was to my wire compost bins and not to any people. Our plan had worked.
I now enjoy watching this remaining stump play host to birds and wildlife. The ivy and mushrooms love to snuggle into crevices. This old friend makes me smile each time I see it, remembering the strength and determination it had to live life on it’s own terms. And now it is resting and still giving back to the universe.
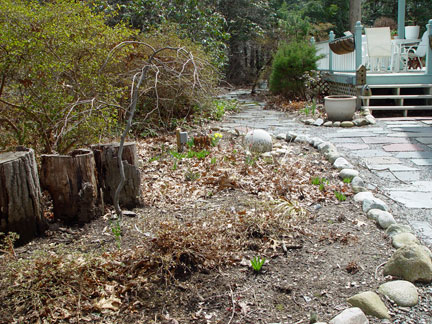
Last year I took this picture in my front entry garden on April 14th. This is just at the edge of where the driveway meets the garden and as you can see, I hadn’t even finished clearing out the leaves from the miniature rhododendrons. The bulbs are all starting to come up and the azaleas behind the tree stumps are getting green. The Cercis canadensis ‘Covey’ or Eastern weeping redbud tree is not yet in bloom and I haven’t turned the water on at the little globe water feature. I haven’t even gotten around to planting the hayracks on the deck banisters.
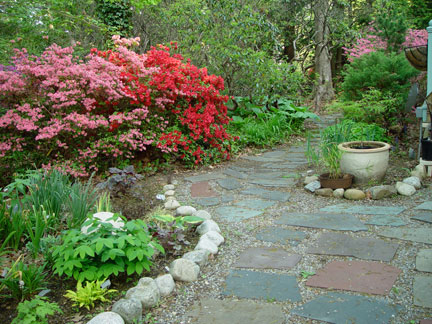
This second photo was taken a month later on May 17th and what a difference! The azaleas, which were here when I bought the property in 1989, are in bloom in the entry garden and in the distance in the front garden. The Uvularia grandiflora or Bellwort is spreading itself in front of my globe. A hosta named ‘Diana Remembered’ that I bought from Terre Nova Nursery is sprouting to the right of it on the curve. The miniature yellow green hosta to the bottom left of the image is called, ‘Green Eyes’. I love growing all different kinds and sizes of hostas but I like even better when the slugs don’t spoil the view. These mini’s I find are particularly vulnerable to becoming salad for the slugs but I like the challenge of changing their minds.
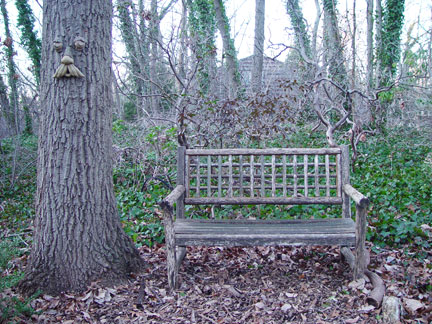
I don’t have much seating around my woodland walks other than tree stumps since it is a place for a meandering journey rather than a destination. But I do have one bench that allows me to sit and take a break if my phone rings while I’m gardening.
It also is very much a destination for my grandsons since they use it as a stopping and starting position for their many excursions with the dinosaurs and forest tigers they’ve found roaming the woods.
This first bench I bought in 2000 to commemorate my graduation from Farmingdale State with a degree in Ornamental Horticulture. By the time this photo was taken in January of 2007, the bench was beginning to sink if you sat on it so it truly became merely a garden ornament.
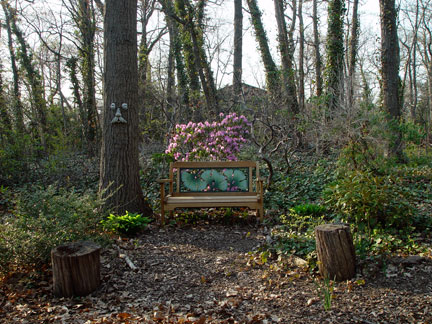
This next bench I bought in September of 2008 to celebrate my birthday. I found it on the web at shop-nc.com:
It surpassed my expectations in the quality of materials and the beauty of the design. I would certainly recommend the product and the company.
I took this photo in April with one of my Rhododendron PJM’s in full bloom. A few years ago I transplanted this rhodi from another part of the garden and positioned it behind the bench to give a sense of enclosure. The view beyond is borrowed scenery since my property line is about 10 feet behind the bench.
Here is a view from behind the bench looking towards my home. If you look closely you can see that I have secured the bench to the adjacent oak tree to prevent it from getting legs and walking out of the garden. Some years ago I found that my wood chipper had disappeared from the garden and it took me quite some time to get over the sense of violation and intrusion.